Table of Contents
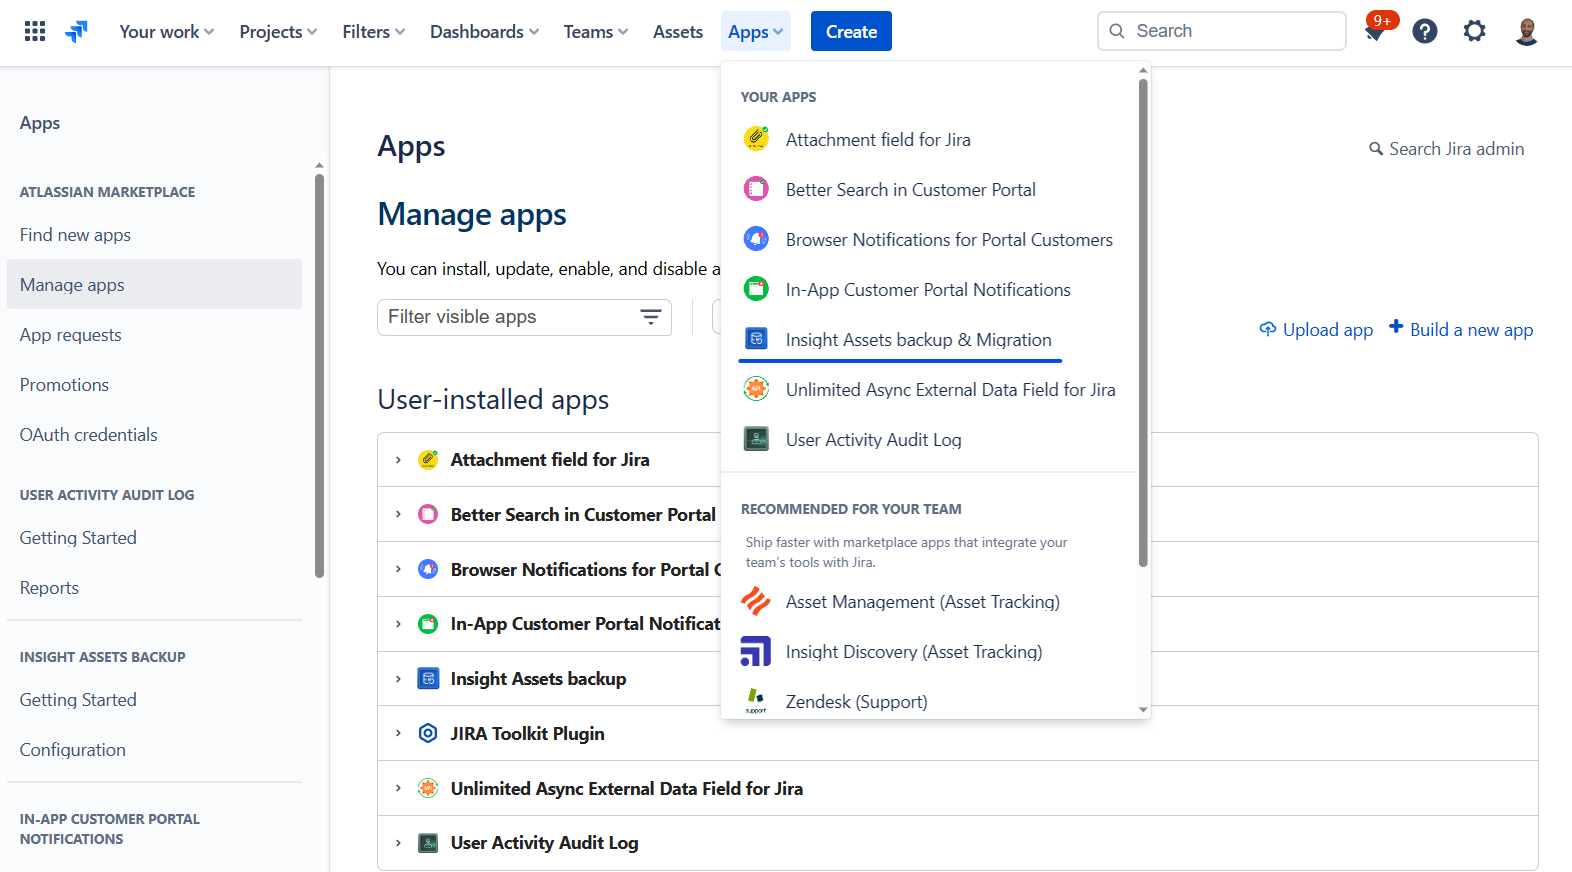
After installation, Insight Assets Backup & Migration is available in the "Apps" administration menu:
Only Jira administrator users can access Insight Assets Backup app!
Initial Setup
After clicking Insight Assets Backup & Migration, if it is the first time when the app is accessed, you will be walked through the initial Setup process:
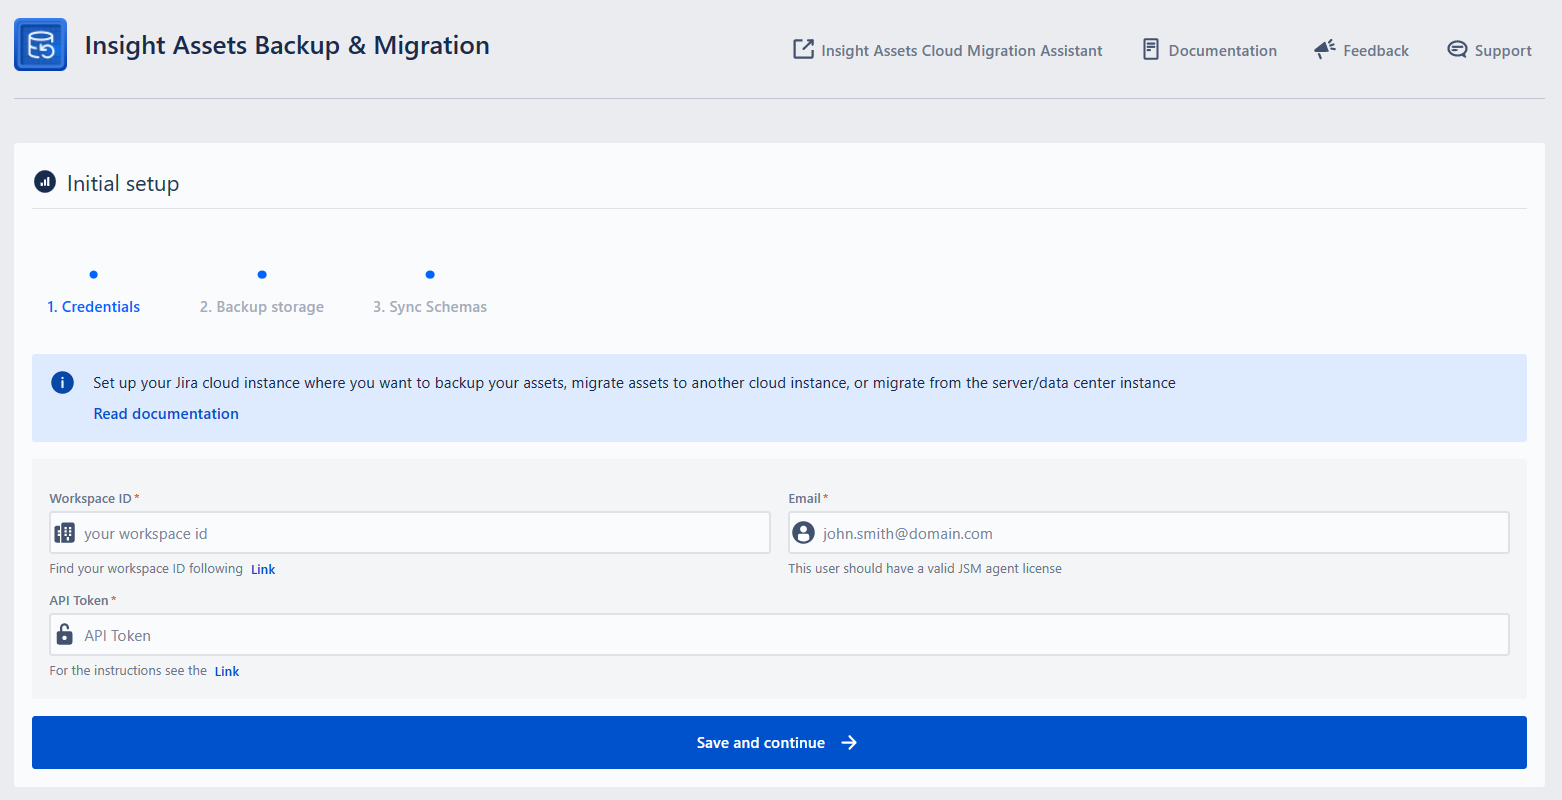
1. Credentials - Token | Email | Workspace ID
For the first step, before creating and configuring individual backup schedules, the following three fields should be filled:
Workspace ID
Fill in the ID of the Assets (Insight) workspace you want to configure backup for. The Workspace ID can be found on the following link: https://[yourcloud].atlassian.net/rest/servicedeskapi/insight/workspace. The Jira Service Management REST API uses the workspace ID to identify your individual instance of Assets (Insight), it is an alphanumeric string at the end of the text shown on the opened link with the following sample appearance:
3b3b70g5-66f8-3c01-a2d7-e5bbf2584dc3:{"size":1,"start":0,"limit":50,"isLastPage":true,"_links":{"self":"https://[yourcloud].atlassian.net/rest/servicedeskapi/assets/workspace","base":"https://[yourcloud].atlassian.net","context":""},"values":[{"workspaceId":"3b3b70g5-66f8-3c01-a2d7-e5bbf2584dc3"}]}
Workspace ID is a mandatory field and it should match the Workspace ID of the instance you are installing the app!
API Token
Atlassian API token secures account access to the API. You can create a token, through the following URL: Atlassian account - API Tokens. You can read more about Atlassian API Token on the documentation page: Manage API tokens for your Atlassian account | Atlassian Support.
After creating an API Token, just copy and paste it into the corresponding “API Token“ field on the configuration page.
API Token is a mandatory field!
Email
Fill in the email related to the Atlassian account (valid JSM agent) that will be used to access the data in the Assets. To create and update the schemas, object types and objects, the user should have valid permissions, at least a Manager role in the schema (in case of resting in an existing schema), or the user should be added to Jira Admin group.
Email is a mandatory field!
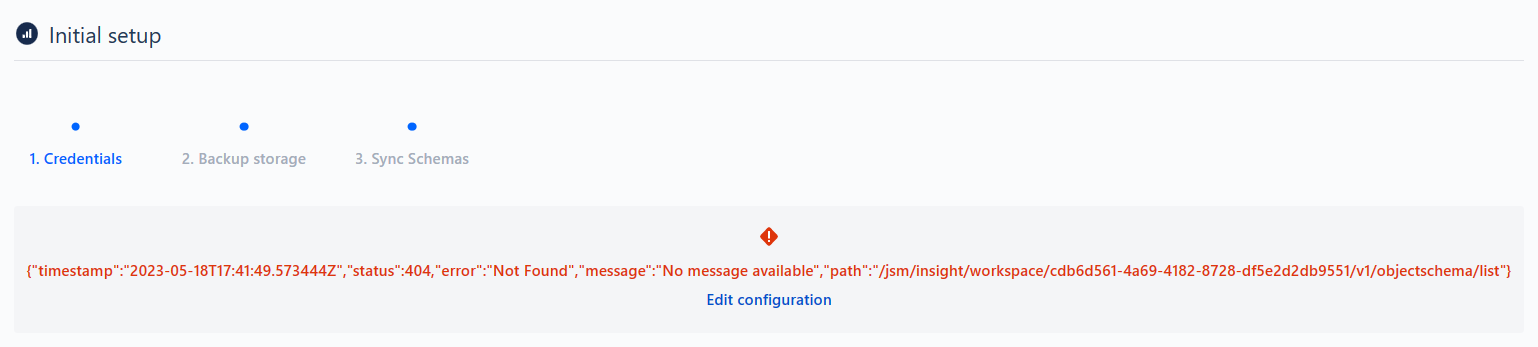
After filling the three fields in, click the “Save and Continue“ button. If there is an error in the filled fields, you will see the corresponding error message and link for editing the incorrect information:
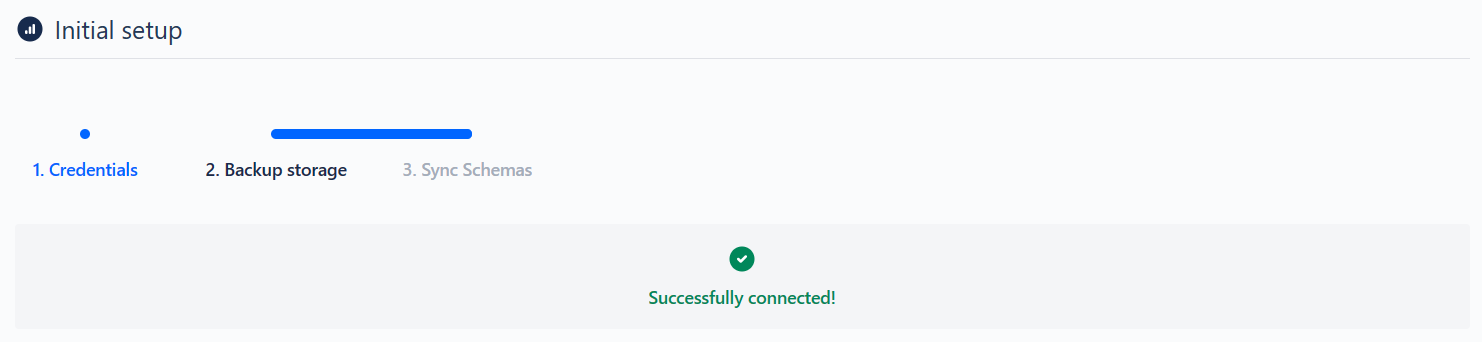
If the filled information is correct, you will see the corresponding success message:
If you have IP allowlisting enabled on your Jira Cloud please contact us to receive the required information.
2. Backup storage
For the second step, you have the option to decide where to store the backups. By default, the backups are stored in Cloud (EU, Germany).
The backups are encrypted on rest and on transfer!
As an option, you can choose your own local database to store the Assets backups:
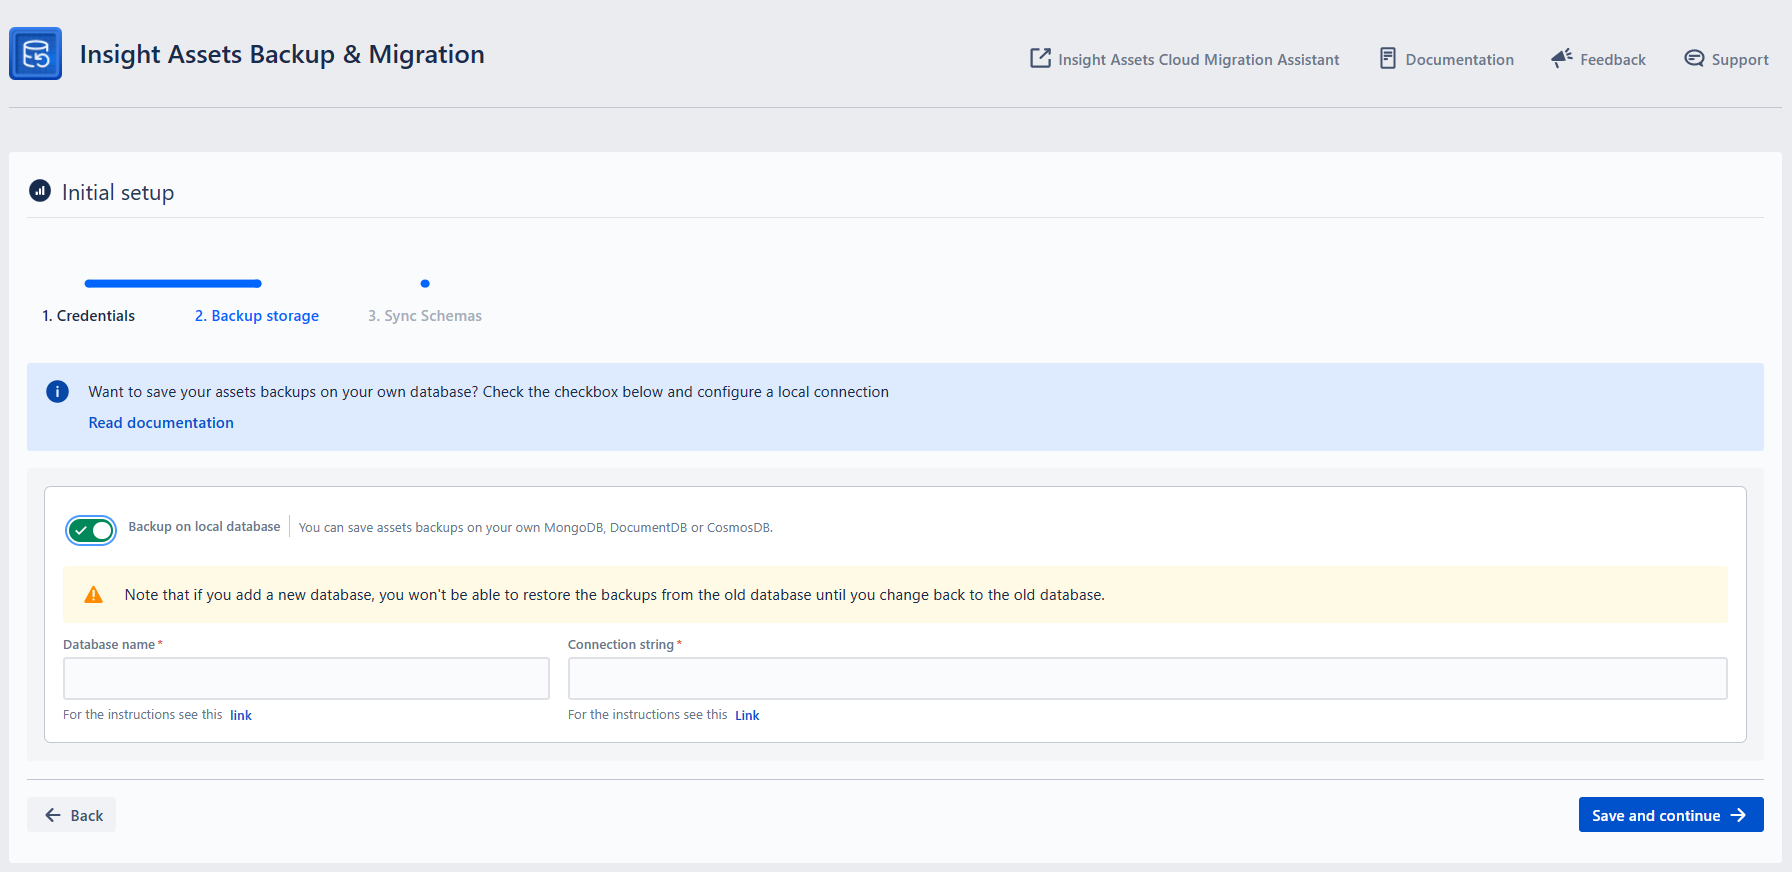
The three possible options for local DB are:
MongoDB
DocumentDB
CosmosDB
To activate local DB storage, switch on the ”Backup on local database” toggle and fill in the following data (examples and instructions are given for MongoDB):
Connection String: read more information about MongoDB connection string here: Connection String URI Format — MongoDB Manual.
Database Name: follow the following link to find the name of the databases in MongoDB: https://www.mongodb.com/docs/atlas/atlas-ui/databases/#view-databases.
After deciding on the database, click the Save and Continue button to proceed to the third step.
The databases will be automatically indexed improving performance.
3. Sync Schemas
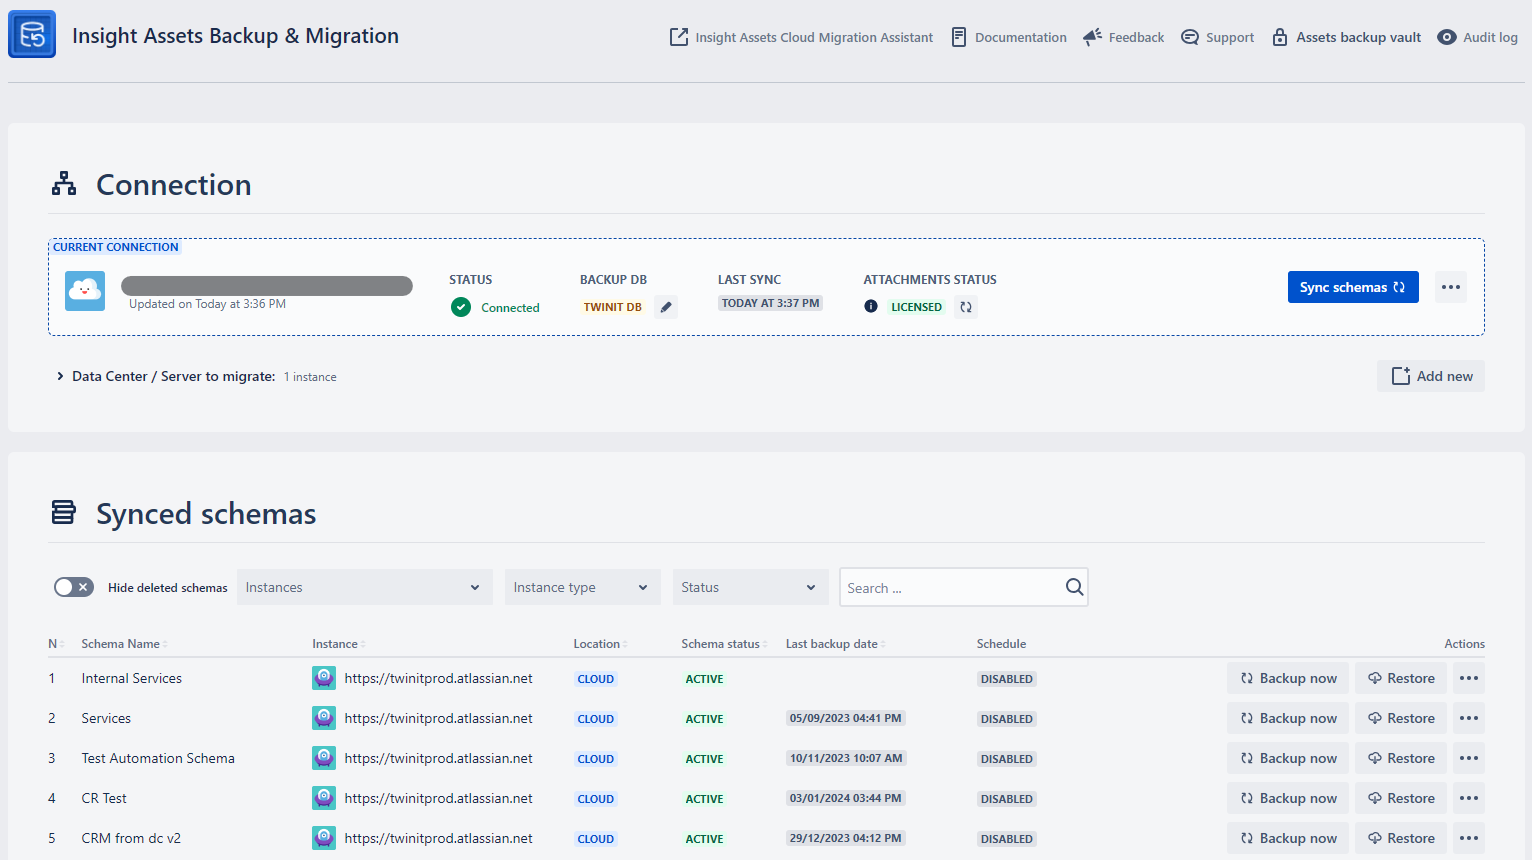
When the backup database is chosen, you will see the Current Connection information and can Sync the existing schemas by clicking the Sync schemas button:

Sync may take up to a few minutes, depending on the quantity of the data in Assets (Insight).
The ATTACHMENTS STATUS shows whether Assets Attachments Backup & Migration app is installed on Cloud and what is the current license status. See Backup and Restore of object Attachments for more details.
After a successful Sync, all the retrieved schemas from Assets (Insight) will be displayed:
When a schema is created in assets (either manually or by restoring a backup), the schemas must be synced with the app.
Go to Synced Schemas for further details.
For the instructions of adding DC/Server schemas, please see Add Data Center / Server page.
Connection
After initial setup, you can do the following actions on the current connection, by clicking the three dots after Sync schemas button:
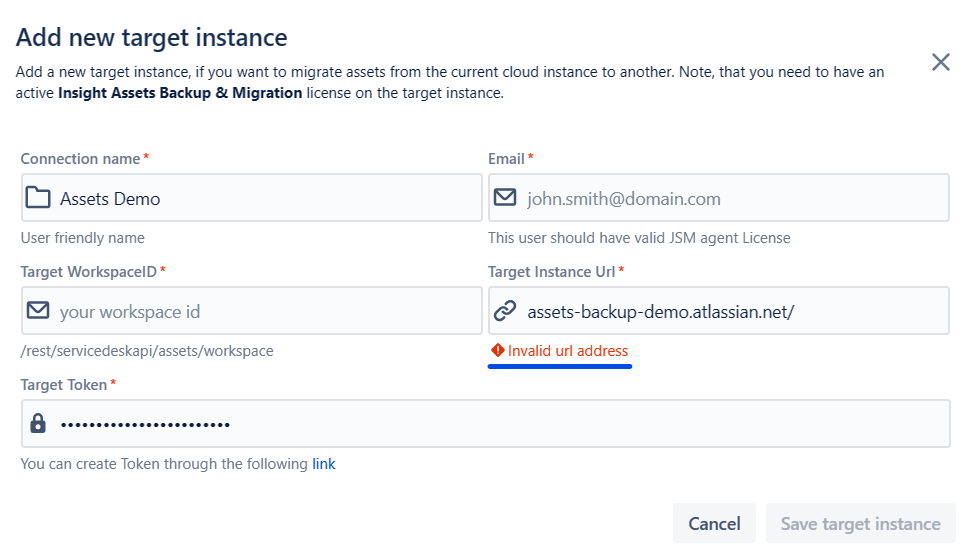
Add new target instance
Here you can add a Cloud target instance, where you can later migrate the backed-up schemas (see Migration to another instance for more details). To add the target instance, fill in the following fields:
Connection name
To easily identify the instance while migrating the schemas
Target Email
Fill in the email related to the Atlassian account that will be used to access the data in Assets (Insight) for a target instance (the user should have a valid agent license!)
Target WorkspadeID
Fill in the ID of the Assets (Insight) workspace you want to restore the backup to. The Workspace ID can be found on the following link: https://[yourcloud].atlassian.net/rest/servicedeskapi/assets/workspace. The Jira Service Management REST API uses the workspace ID to identify your individual instance of Assets (Insight), it is an alphanumeric string with the following sample appearance:
3b3b70g5-66f8-3c01-a2d7-e5bbf2584dc3.
Target Instance URL
URL of target instance: https://[yourcloud].atlassian.net
Make sure to include “https://“ in the URL, otherwise you will not be able to save the instance - the corresponding error message will be shown along the field:
You also won't be able to save the URL if you indicate https:// but in reality the URL does not support https://
Keep in mind, that you cannot use bypass like
localhostorlocaltest.me
Target Token
Token for the target instance: you can create a token for a different, through the following URL: Atlassian account - API Tokens. You can read more about Atlassian token on the documentation page: Manage API tokens for your Atlassian account | Atlassian Support.
After creating a token, just copy and paste it into the corresponding “Target Token“ field.
After filling in the necessary information, click the Save target instance button to add the instance to the list.
Insight Assets Backup & Migration app must be installed on the target instance, unless it is not a sandbox instance of the current connection.
After the instance is added, you can see and modify it from the List of target instances.
List of target instances
From here you can see and manage the added target instances:
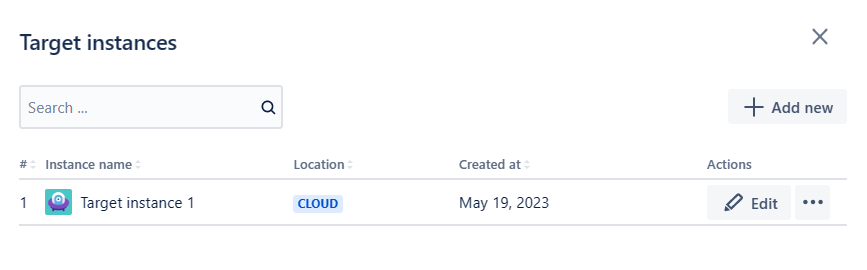
The list shows:
Instance name
Location
Cloud
Data Center
Created at
Date when the target instance was added
Actions
Edit
To modify the instance details. After clicking Edit, you will see the same fields as for adding the new instance
Delete
To delete the target instance from the list
You can also add a new instance, by clicking the +Add new button.
Edit configuration
From here you can modify the details of the current instance:
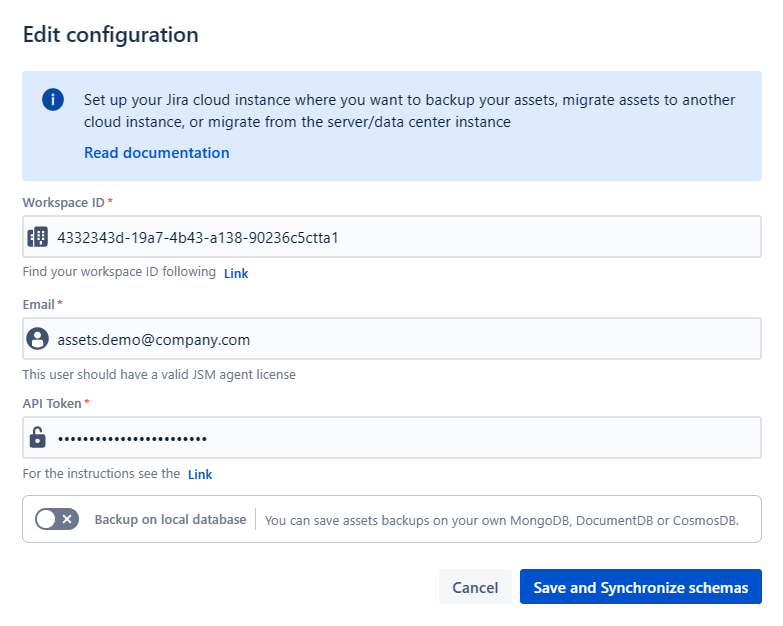
You can modify all the fields that were configured during the Initial setup, including the local database, by turning on the Backup on local database toggle.
Delete
You can delete the current connection by clicking Delete. You will see the confirmation popup:
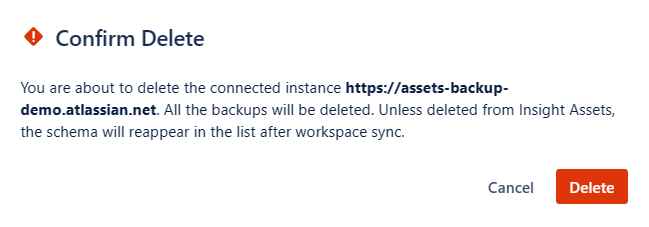
If you click the Delete button, the synched schemas will disappear and to continue using the app, you will need to go through the Initial setup.
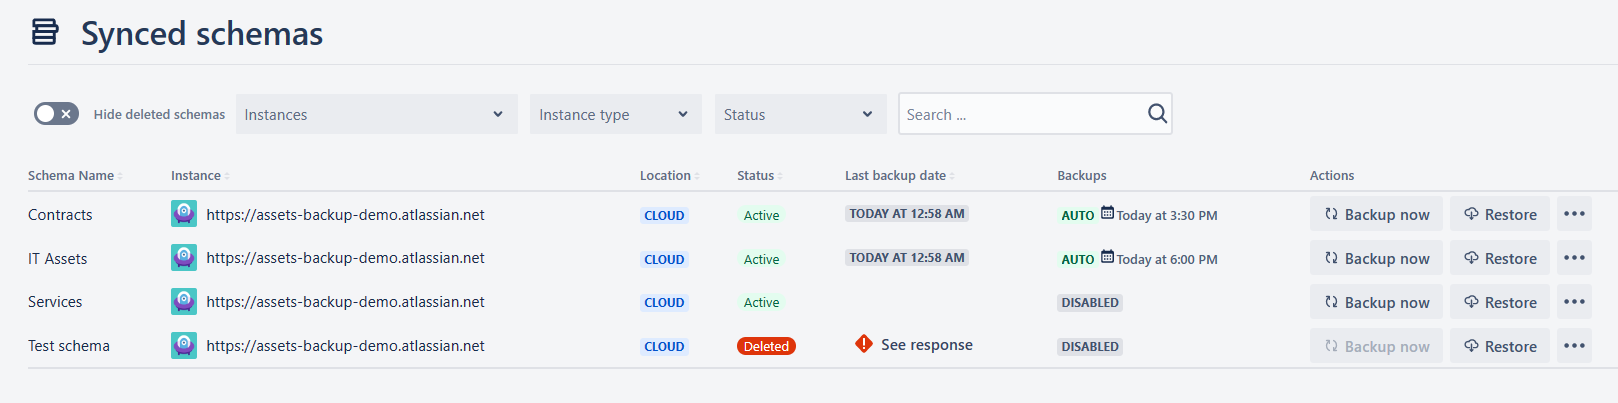
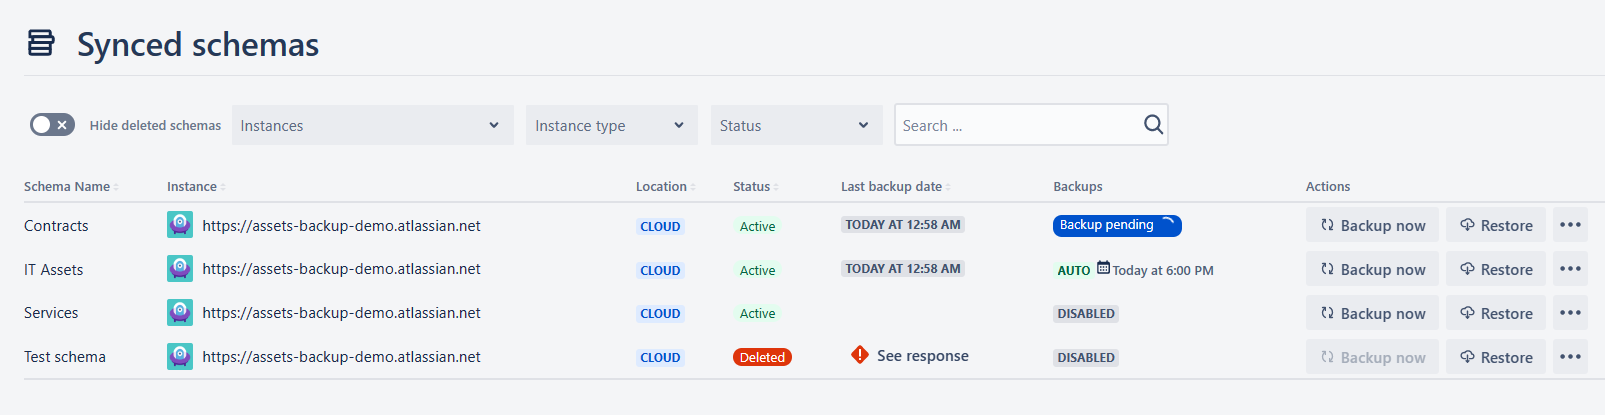
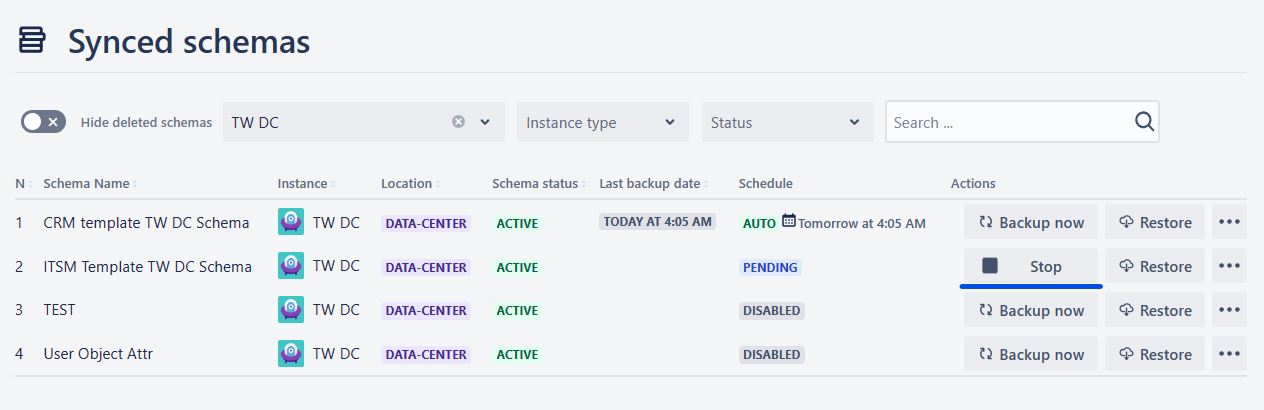
Synced schemas
Here you can see the synched schemas from the current instance and Data Center / Server instances. The grid shows the following information:
Schema Name
Instance
URL of the instance where the schema is located
Location
Cloud
Another Cloud: Backup schemas from another instance
Data Center: Add Data Center / Server
Status
Active
Deleted
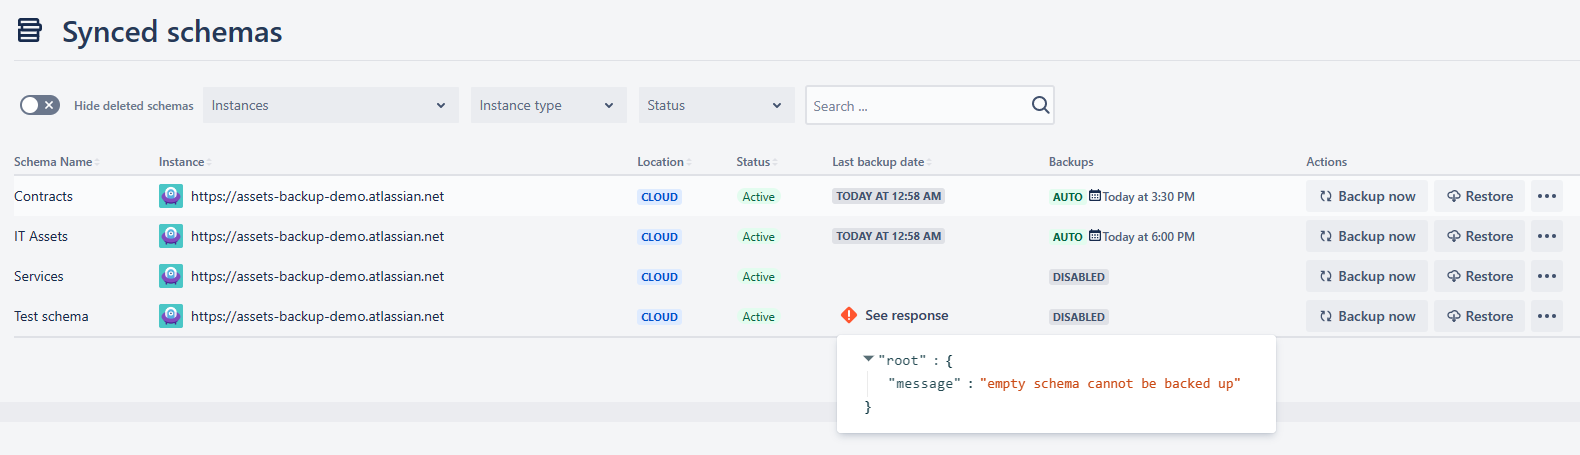
When the schema is deleted from the assets. It is not possible to backup the deleted schema, in this case Backup now button will be disabled:
Last backup date
Date of the last backup
In this column, additional information might be shown, e.g. regarding the last backup backup error
Backups
Disabled
When the backup schedule is not set
Pending
When the backup has not yet started and is in the queue
In Progress
Backup in Progress
Auto
Backup is scheduled
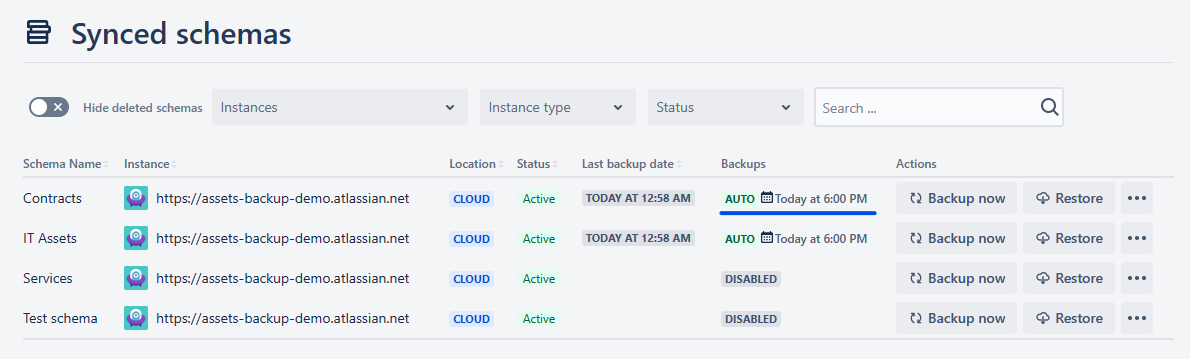
The next backup date will also be displayed:
Actions
You can schedule backup using a corn expression
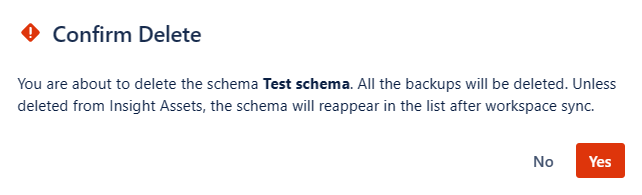
Delete
After clicking the Delete button, you will see the confirmation popup:
After restoring the schema on the current instance, the schemas will be automatically synced.
If you delete an active schema (meaning it exists in Assets (Insight)), the schema will reappear after a sync.
If you delete the schema with the Deleted status, schema will be permanently deleted, including all the corresponding backups.
You can also use additional filters for filtering the schemas in the grid:
Hide deleted schema toggle
By turning off the toggle you can hide the deleted schemas
Instances (single-select)
You can choose the instances for which you would like to see the schemas
Instance type
Cloud
Data Center
Status
Active
Deleted
Search
You can search the scheme by name. After typing the first letter in the Seach field, the schema grid will be automatically filtered according to the search term.
Dates and times are shown based on UCT according to your timezone settings. Daylight savings are also elaborated while showing last and next backup dates and times.
When there are more than 25 schemas in Assets (Insight), pagination will appear below the Schema Grid.
Schema Backup
You can back up the desired schema either manually or by scheduling regular backups.
Manual Backup
To back up the desired schema, click Backup now button under the Actions of the schema grid. After clicking the button you will see the confirmation popup:
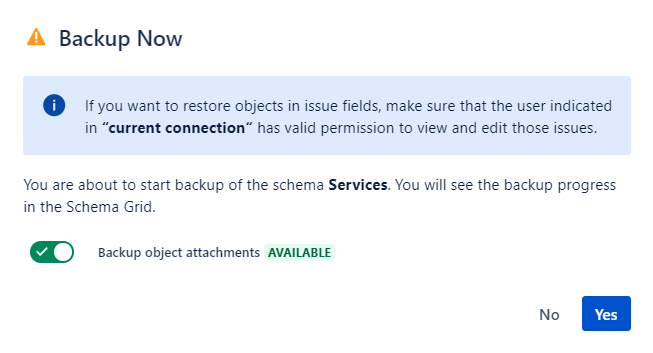
You can backup also attachments by enabling the toggle, if the Assets Attachments Backup & Migration app is installed on Cloud. See Backup and Restore of object Attachments for more details.
Click the Yes button to start the backup. You can check the backup process status along the corresponding schema in the Synced schemas grid:
When the backup is started you can stop the process anytime, by clicking Stop button:
After you click the button, you will see the confirmation popup either to stop the process or abort the termination of the backup:
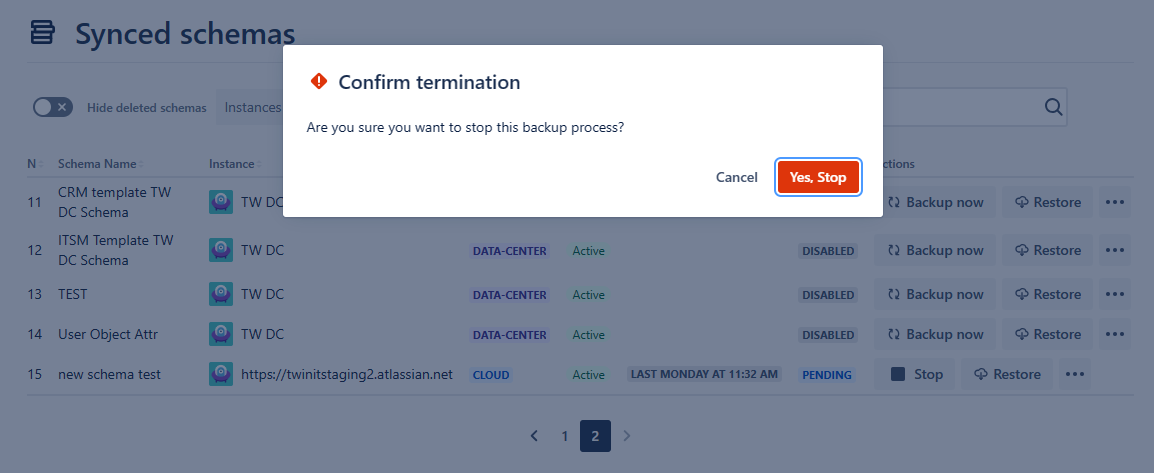
The terminated backups can be seen in the Audit Log.
After the backup is finished, you can check the status below the Last backup date column. If the process was successful, you will see the date and time of the last backup. Otherwise, you will see the error message, explaining the problem with the backup.
If a schema contains many objects, backup may take up to hours. Also, please keep in mind that if you start more than one parallel backups, it may also take long due to the Request per minute limitation of the corresponding Atlassian REST API.
After backup is completed, icons will be backed up in background, which may also take several hours, depending on the number of objects. Therefore, if you are trying to restore backup immediately, icons may not be included.
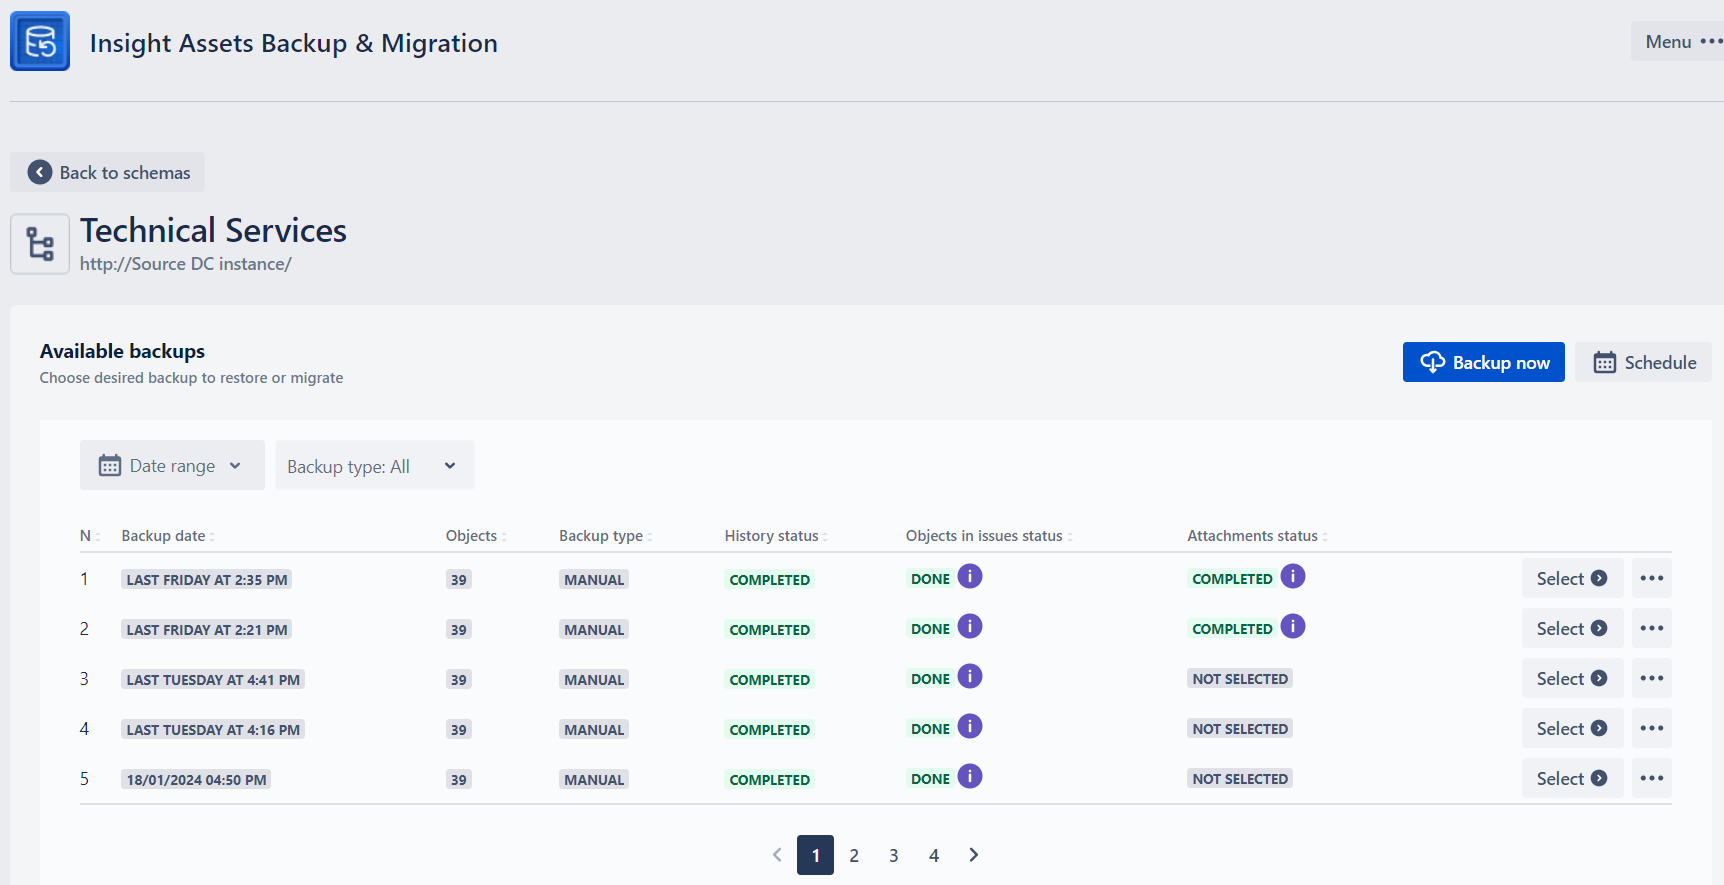
After the backup is completed, the new item will appear on the Restore page, under Available backups (see Restore and Migration Guide for more details):
Empty schemas cannot be backed up. If you try to backup such schema either scheduled or manually, you will see an error message by te corresponding schema.
Due to the limitation of Database, if size of the object equals or exceeds 16MB, such object will not be backed up!
Please try not to change anything in Assets (Insight) while backup is running! If schema contains may avatars, the very first backup may take long. In addition, after backup is completed, the avatars will be being backed up in background. This means that if you try to immediately restore a schema after backup is finished, avatars may not be restored. Exact time depends of the quantity and sizes of the avatars, but with considerable number, we recommend to wait at least 1 hour until restore.
Backups are be stored in cloud for 1 year after backup date.
If you want to restore objects in issue fields, the user indicated in “current connection“ must have valid permission to view and edit those issues before the backup has started.
Schedule Backup
A backup schedule should be configured for an individual schema. To configure the backup schedule, click on the Schedule backup button, under three dots along the desired schema. The schedule configuration window will pop up:
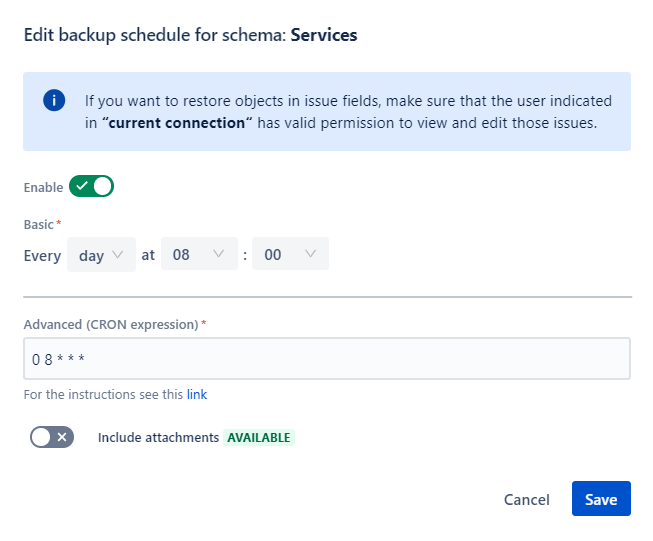
You can backup also attachments by enabling the toggle, if the Assets Attachments Backup & Migration app is installed on Cloud. See Backup and Restore of object Attachments for more details.
To switch backup on, activate the “Backup On/Off“ toggle. The green color of the toggle corresponds to “On“ and the grey color corresponds to “Off”.
You can define the schedule at a specific time by choosing from every:
Year
Month
Week
Day
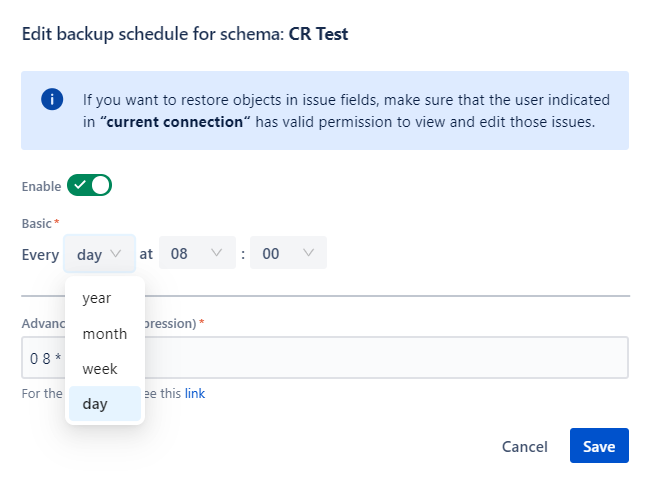
Cron Expression
To enhance the backup schedule, cron expression is used. A cron expression gives you control over the frequency, compared to the default schedules. It is a simple and straightforward expression to define the backup schedule. You can find more information about how to construct the expression on the following links:
For example, the Cron expression “0 0 * * *“ will run a backup every day on 00:00. Cron expression is a mandatory field. Non-standard cron expressions are not supported (e.g.: @yearly, @annually, @monthly, @weekly, @daily, @hourly, @reboot, etc.).
After deciding on the schedule and filling in the expression, click “Save“ button.
After clicking the “Save“ button, the first backup will be immediately executed. The following backups will be executed according to the defined schedule.
If the Cron expression is not valid (e.g. number of hours is more than 24 or the number of minutes is more than 60), after clicking the Save button, you will see the error message - “Cron expression is not valid”:
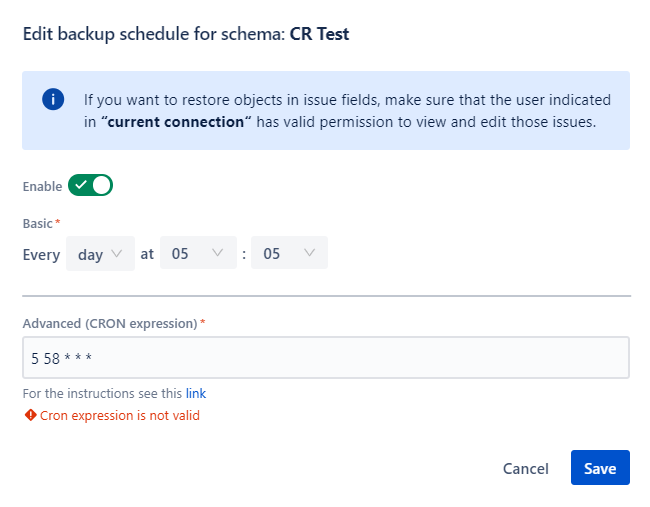
After editing the Cron expression, the modified schedule will be displayed in the “Next Backup” column in up to 20 seconds (browser refresh is needed to view the modified schedule).
Allowed frequency of backup
The minimum allowed frequency of backup is once per day. If the cron expression implies more frequent backups, it will not be possible to save such a backup configuration and you will see the corresponding message:

Backup of objects in Jira issues
During schema backup, the information about objects selected in Jira issue fields will be also backed up. The corresponding backup status will be shown under “Objects in issues status“ in the schema restore page (Available Backups).
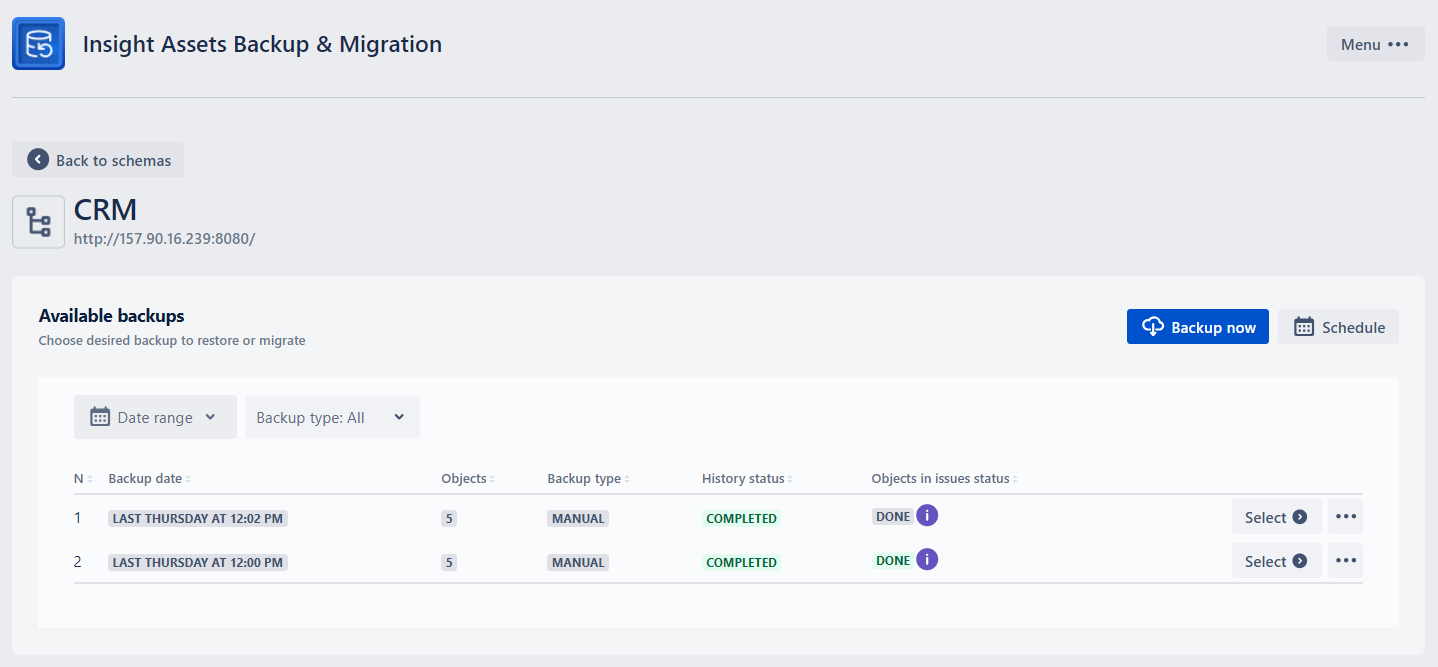
Clicking the “Info“ icon will display the number of the issues, information of which was recorded in the backup. The number shows a number of the unique issues where the objects from this issue are selected and do not depend on the number of fields and the number of objects.
You can check whether all the issues were recorded by comparing this number and finding the number of the issues via JQL in Jira (e.g. by searching all the issues where the corresponding Assets custom field is not empty).
When Insight Assets Backup & Migration is uninstalled, all the backups will be deleted!